


16 Apr Project Bike 2019 – Specialized Shiv TT
I was vaguely in the market for a new bike. Mostly because I’d been aboard the Garneau TR1 since 2017 and was keen for a change. The long-term plan was to go disk, but a disk frame was just not in the cards for this year – read: too damn expensive. But I did want something different, and ideally something long and low. I was mostly eyeing old Cervelo P3 frames, but there were none that were well-enough priced to justify the purchase.
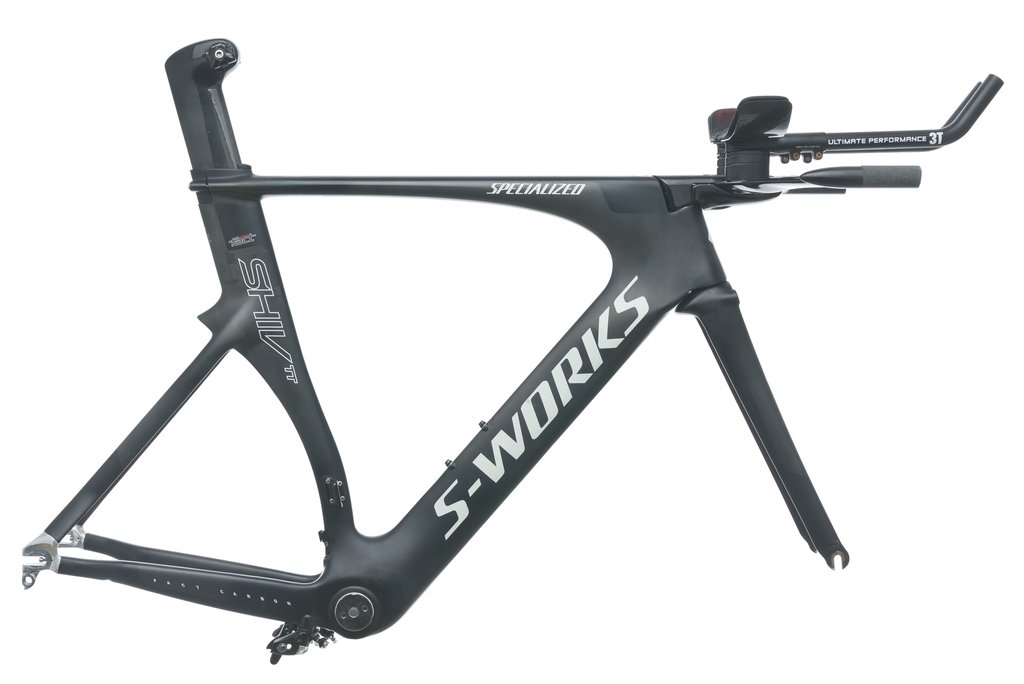
Then along came this Shiv TT. The size was right, and the geometry fit what I wanted. It was a 2013, but only had one owner. The build was outdated, but I was honestly prepared to pay the asking price for the frameset alone.
So here we are: N+1.
I have key objectives for the final version of this bike. All of the modifications I make to it will comply with these 3 rules.
- It shall fit. This is obvious but getting a TT frame to fit is not always super straightforward.
- It shall be aero. Another ‘duh’, and that frame is a great starting point.
- It shall be cheap. The toughest of all bike-related rules!
With those rules in mind, here’s the plan.
Cockpit
This front end of this bike was ahead of its time. Specialized did a nice integration job well before integrated front ends were a thing. One element specifically that stands out, is the massive 115mm!! stack range. That allows this bike to fit a whole range of front-end height preferences. It’ll go a whole lot lower than this dad bod will allow. The drawbacks – there are two – are that there is very limited reach adjustment and that the bars do not tilt.
Reach, luckily, is a non-issue for me. With the non UCI-legal, fast-forward seatpost installed, the reach on this large Shiv TT is pretty much spot on. If I did want to muck around with it, the most straightforward way is to replace the Specialized pad holders with something like the uber-adjustable ones from TriRig or 51 Speedshop.
Tilt is an issue, however. I find that I’m one of those athletes who likes a fair bit of extension tilt. There are DIY options, but I opted for the custom tilted pads from Alden Carbon in Indiana. They’re being molded for me as I write this. Since these pads don’t help with the lack of tilt on the extensions, I will be replacing the stock ones with Zipp’s excellent Vuka Alumina Evo in 110mm. These things are an awesome aftermarket upgrade for anyone with wrist discomfort using traditional shapes. There’s a reason they’re being emulated by other brands.
Fit: check!
Aero: check!
Cheap: well…as cheap as I could make it and still have it fit. Cost – $185
Drivetrain
Plan A is to simply upgrade the current Ultegra 6600 to 6800 with hardware I already own. The cranks too – currently 50-34 / 170mm – will need to be replaced with my preferred 53-39 / 165mm.
Fit: check!
Aero: aero-ish
Cheap: mostly – labour and cables only. Cost ~$70
Plan B is to build the thing up as 1x. This would cost a little more since I’d have to spring for the new Ultegra RX800 clutch rear derailleur and something like Wolfetooth’s narrow-wide 1x chainring. Plan B would be a little more aero and a little more cool, but it doesn’t adhere to rule 3.
Fit: check!
Aero: check!
Cheap: nope. Cost $250 more than plan A
Wheels
Being an older frame with tight clearances and wonky brakes, wheel choice is limited. I hope my rear PRO disk fits. Up front is still a bit of a mystery. I don’t really want to invest much in rim-brake wheel, so I’ll have to see what’s out there.
Fit: na
Aero: check (I hope!)
Cheap: TBD
Brakes
The TRP brakes in this Shiv are aero, and that’s about the only nice thing I can say about them. The front is average at best. The rear is largely ornamental – and that’s saying something, given that it’s hidden from view. It’s likely that replacing the cable and housing for the rear will help, but I can’t imagine that it’ll help much. This is Plan A.
The plan is to replace the Profile brake levers too. I have a set of new TRP levers that perform well and look a lot less dated too.
Fit: na
Aero: check!
Cheap: check! Cables and labour only
My first thought was to replace them with any of Shimano’s excellent direct-mount models. But, of course, the peg spacing is not the same. Thanks manufacturing standards!
TriRig’s Omega X brakes will fit, but at 190USD a pop, that’s north of 500CAD for the pair worth of upgrade. So there’s a pin in that one.
Fit: na
Aero: even more aero than before!
Cheap: certainly not. Cost: $500
Saddle
The ISM saddles work for me. I’ve been switching between the PN and the PS. I have both. One will doubtless work here.
Fit: check!
Aero: na
Cheap: free!
So that is the plan. I hope to have it all assembled and ready to go fast by mid May. Then, I’ll hook up my Notio Konect aerodynamic sensor and see just how fast this thing really is!
Ryan Malfara
Posted at 18:23h, 16 AprilExcited to see how this comes together!
Tim Robinson
Posted at 04:48h, 12 JanuaryHi,
Loving the build. I am interested by the seatpost you used. I have the Shiv TT from 2017 and it comes with a seatpost with layback not “lay forward” like you have.
Would be very keen to purchase one like yours but cant find any mention of it on the internet apart from here.
Is yours symetrical so it can be put in either way round? Mine is not. I wonder if they changed the shape of it between 2017 and 2019.
Many thanks!